Thursday, April 2, 2020

The Owl

I wanted to make an owl quilt as a present for a colleague. It turns out that I started this on Feb 1, just as the pandemic was exploding and I finished today, as we are social distancing and praying that we have flattened the curve enough to get through the 'surge'. Working on this has been a sanity-preserving bit of time-out to focus on creativity instead of organizing staff and colleagues to work from home and looking for hand-sanaitizer.

I found the pattern on Lori Kennedy's blog from 2015 (https://lorikennedyquilts.com/?s=great+horned+owl). The original pattern was created by Peggy Aare (https://wisconsinquilting.wordpress.com/2015/03/13/great-horned-owl-paper-piecing/) and is based on an owl (Rebecca) that lives at Linwood Research Station. The pattern uses 14 different shades ranging from very dark to very light. Although Peggy shared her list of Kona and Bella solid colors, I did not want to buy a lot of fabric for just a few triangles, so I bought an brown-beige ombre and cut strips to get about half the colors. The rest came from my stash.


Colored triangles cut out of the printed pattern and
arranged in order by shade. Numbers indicate
the number of times each color is used.

Strips cut wide enough for the triangles, labeled with the
color number and arranged in order by color

I also pasted up the full size map and printed out foundations (reversed) for all the pieced triangles and pinned them in place ready to be constructed.

Paper pieced triangles about half done.

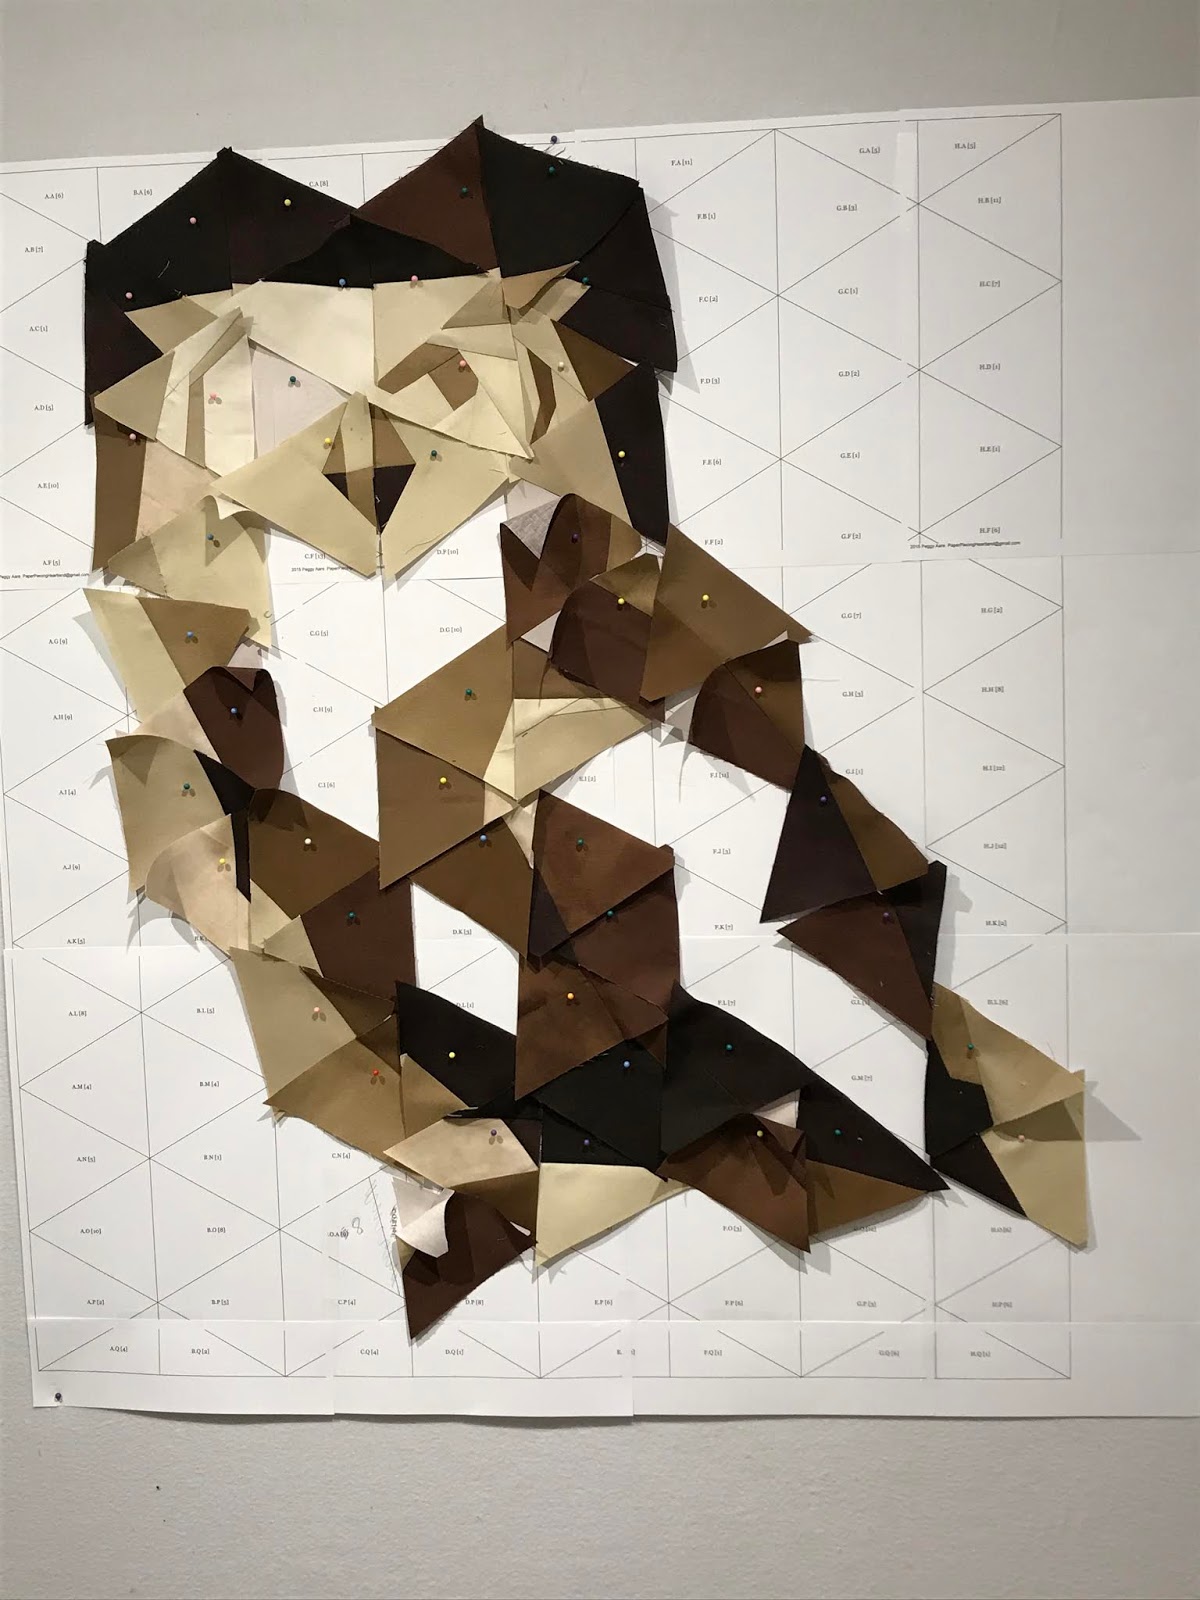
Pieced triangles done except for the right eye.


All the pieced and solid triangles pinned in place and ready to be sewn together. They go
together in columns and if you alternate the direction (up or down) for pressing the seams,
the columns sew together easily with perfect or nearly perfect intersections.
After piecing, it was time to quilt. I decided to use wool batting for some poof, and to put a light canvas between the batting and the backing for extra heft and stability. Seems like I always have to experiment. I wanted the quilting to be somewhat abstract except for feathers on the owl and to mostly provide texture, so decided to use kimono silk, more or less matching the fabric.
I practiced with a narrow zigzag for ditching the vertical
seams which were pressed open, and to check out colors,
tension, etc.
Here she is in all her quilted glory, perched on a 'ruler-work' branch. I've engaged the edges as
Robbi Joy Eklow says, by having the background migrate out into the border, and having the border
migrate in. The borders are uneven (partly because I ran out of fabric) and are kind of a
window frame or maybe a tree trunk.
Close-up of the face. Hi-lights in the eyes are tiny dabs of
white fabric paint. I practiced on a life sized printout of a picture
of the head to test positioning before 'committing'.
The back is almost better than the front.


I love how this turned out, i love the slightly abstract equilateral triangle construction and can definitely see designing something else using this strategy of simple (well sort of simple -- the eyes were a challenge) foundation piecing, and I'm more anxious than ever for the pandemic to calm down enough to give this to my friend.

Just as I was finishing this I heard about the Quilts Inc call for an exhibit called Quarantine Quilts: Creativity in the midst of Chaos. What could be better and more appropriate. AND I finally have a quilt that meets the size criteria. I entered 'The Owl', so, fingers crossed, maybe she will get in.

UPDATE: Yes, The Owl got into the exhibit. The exhibit will no happen in person, however, the quilts will be in a book and will be in a traveling exhibit next summer and fall, in Paducah and then in New England. So exciting.

Thanks for reading,
Susan


Saturday, March 30, 2019

Dresden Echinoderms

It is SAQA Benefit Auction quilt making time. Each donated art quilt is 12"x12". Even before I finished last year's, I had the idea for this year's.


The individual urchins were each made as a separate unit, using templates and appli-piecing (Caryl Bryer Fallert-Gentry's method).

Detail from sketch -- used to trace to make the pattern

Close up of appli-pieced urchin - stitched on folded under edge with 100wt silk

I auditioned several possible backgrounds, and settled on the yellow-ish batik.


The urchins were positioned on the background, and machine appliqued in place. The top was  misty-fused to cotton batting, with extra wool trapunto under the urchins in preparation for hand stitching, which is much easier without the quilt back in place. Knots are easily buried in the batting from the back. I used hand-dyed #8 Perl cotton from Laura Wasilowski. After hand-stitching, I added the backing fabric and auditioned quilting ideas.
After quilting, it seemed like the quilt needed something -- maybe some little clumps of sea grass? This also shows auditioning green or black #5 Perl cotton to couch down in the ditch of the binding. Black won -- you don't really notice it, but it definitely adds something.
The final touch was hand stitching beads along the seam lines, like in the sketch. I had purple and blue beads in my stash but had to order the orangey-red ones. In fact, that is the only thing I bought -- everything else was selected from my stash. After beading, the white nylon beading thread was touched up with fabric markers to match the bead color.
Dresden Echinoderms (12" by 12")
Triangle corners on the back, with a slat (to be added) provide a hanging mechanism. The label was made by tracing computer lettering with Tsukineko ink and then hand stitching in place. Note how the zigzag stitching used to couch down the Perl cotton on the front just catches the edge and secures the binding on the back.

I love how this turned out -- it definitely matches my vision -- and was a lot of fun to make. Every step had lots of choices and challenges.

The auction will be open for bidding in September. Bid early and high. ;-)

Thanks for reading.

Addendum: Unlike the urchin appliques, which were added to the top, the clumps of sea weed were added after the quilt was more or less finished and I forgot to change the bobbin from gray (used for piecing another project and shown on the right below) back to the yellow-ish color used for quilting (center below). It stuck like a sore thumb. As you can see, in the sample below (left), a little Tsukineko ink magic fixed the problem -- now you cannot tell.

Update: The quilt did not sell in the main SAQA auction, but I found out at IQF Houston 2019 SAQA exhibit that it did sell in the online post-auction sale area. Yeah!!

Sunday, February 17, 2019

Cats -- Max & Friends

Max & Friends— just finished and presented to our friends. They are big cat lovers and for most of the 19 years that we have lived across the street, they had a white bob tail cat named Max. Max terrorized the dogs. His was his own cat and quite a character. He died recently. There are too many other cats to memorialize individually but Max stands out.

The 34x34 inch wall hanging was designed in EQ8 and uses paper-pieced cat silhouette designs by Janeen van Niekerk https://quiltartdesigns.blogspot.com/ (purchased on EQ8 store) and slightly modified to bob Max’s tail. Janeen does amazing designs.


The challenge was to make the whole quilt with stuff from my stash. Cat bodies are grunge layer cake squares and the backgrounds are shot cotton fat quarters (I should have starched more heavily — the shot cottons were thin and stretchy). I even had enough of the cat names fabric for the backing.
Quilt batting is wool. I spray basted. I used a lot of different threads for ditching and background quilting and used up most of the fabric remnants testing threads and patterns.


The label was mocked up in PowerPoint and traced onto the label fabric with a fine tip stylus and tsukineko ink and a light box. The binding was machine finished with my trademark couched Perl cotton.


This was fun to make. It took a while (mostly because Of my schedule) but there was no deadline and I savored every stitch.

If you have been, thanks for stoppng by.
Susan

Saturday, March 3, 2018

Dresden Day at the Beach


Its SAQA Benefit Auction donation time again and this year's Dresden plate/fan quilt is inspired by colorful umbrellas at the beach. It started with a sketch on my iPad.

Sketch of design idea done in Paper53 on my iPad
Mock-up of design
The design process included mocking up the whole design in EQ7, removing the umbrellas and drafting the background landscape in EQ7 for piecing, drafting the umbrellas as separate paper pieced units, and the really fun part -- picking fabrics.


Background for piecing

Foundations for umbrellas


I live in Houston and our house flooded during Hurricane Harvey, so my quilt studio is very reduced in size, and most of my stash that wasn't damaged is in storage. I did treat myself to the purchase of Marcia Derse's beautiful set of half yards from her Palette collection, and those are what I used for everything but the sky.

Cutting and ironing set-up on kitchen counter

Pre-cutting pieces for foundation
piecing the purple umbrella


To piece the background I used methods I learned from Ruth B McDowell and Ruth Powers. I traced the background pattern (reversed) onto freezer paper, added registration marks and then cut out each piece as a template. for a bigger piece, I would make two copies, one to leave intact and one to cut up. Templates were ironed onto the wrong side of fabrics, cut out with 1/4 inch seam allowance, registration marks were transferred, and then the pieces were aligned and sewn together in sections (a la foundation piecing) and then section were sewn together. Umbrellas were made separately as free-standing units that could be positioned, stuck down with a little Roxanne Glue and machine appliqued. Before adding the umbrellas, I decided I did not like the sky -- too ominous looking, so I auditioned some alternatives. I also changed out part of the water.

Original pieced sky.
Sky alternative 1, printed fabric with clouds
Sky alternative 1, hand-dyed fabric from Frieda Anderson
Final choice with sky and part of water replaced,
and umbrellas appliqued in place
In preparation for hand embroidery, I fused the batting just to the top. After doing the hand work, I added the back fabric and machine quited to add contours to the sand dunes a pebbled path, clouds, etc.
Embroidery using hand-dyed perl cotton (#8) from
Laura Wasilowski and doubled 12wt threads from Jane Sassaman to make waves, birds and grasses.
Completed piece
This was a lot of fun to make and brought back great memories of the beautiful beaches, clear skies and turquoise water of the Caribbean.

Thanks for reading -- comments welcome.
Susan

Sunday, April 2, 2017

Dresden Fireworks

Last year I donated a small quilt to the SAQA Benefit Auction called Dresden Daisies https://susieturn.blogspot.com/2016/04/dresden-daisies.html. The asymmetric paper-pieced Dresden Plates reminded me of fireworks exploding in the sky and seemed a good choice to try for the 2017 auction. Check it out.

I used an app on my iPad to sketch out the general idea. 

Sketch of design idea done in Paper53 on my iPad


The design process included drafting the individual units in EQ7, and selecting a color scheme and fabric. Based on past experience and what catches my eye when I browse through the SAQA auction catalog, the brighter and more hi-contrast the better.
EQ7 blocks

Color choices -- I only had a fat quarter of the purple-blue background, but it seemed perfect.


Just like with the Daisies, the 'aerial explosions' were paper pieced individually and then appliqued onto the matching background fabric. The background behind the explosion is then cut-away to allow removal of the foundations. I used That Patchwork Place Foundation paper. It is feeds through the ink-jet nicely and tears off really easily, even using a regular stitch length. Amazing!
Quilt top with aerial explosions appliqued on
 The Dresden Plate centers were 'fussy cut' and appliqued on with a little stuffing. The top was sprayed basted to wool batting and then embroidered with 3 different hand-dyed #8 perl cottons from Laura Wasilowski. I again used the iPad app to try out some different ideas for the stitching.

Photo of quilt top layered with wool batting that was then imported into iPad app to add stitching ideas.


Dresden Fireworks -- stitched, machine quilted and bound.


The backing was added after the embroidery was done, which makes hiding all the knots and thread ends really simple. Machine quilting in-the-ditch and a few stars in the back ground secure the layers. The backing is a heavier cotton sateen with a 'print on demand' image created with permission from one of my sister-in-law's paintings. I used up all (and I do mean ALL) the remaining background fabric for the 'butted' binding. There are folded triangles in the upper corners for hanging.


I also machine quilted the label info in cursive. I used red King Tut, but it doesn't show quite a much as I'd like. I might redo this before sending it off -- if I'm lucky, I'll never see it again.


UPDATE: I shared a photo with Laura Wasilowski and she posted a very nice plug. http://artfabrik.com/thread-as-fireworks/
Thanks Laura. Love the thread!

UPDATE, UPDATE: Dresden Fireworks sold for $150 in the SAQA benefit auction. Yeah!
http://www.saqa.com/auction-viewdetail.php?scat=60&ID=82