Tuesday, October 25, 2016

ESR1 K303R

It is that time of year -- October, the weather is cooling off and pink is everywhere. Its Breast Cancer Awareness month. Seems only fitting to show something breast cancer-ish.

In my day job, I've spent most of my career working on breast cancer research studies, and on the quilty side, right now, I'm slowly ( I do mean slowly) working on a wall-sized quilt that will be a surprise gift for a friend. The english-paper-pieced hexagon construction, which is appliqued onto a background, represents part of the sequence of the estrogen receptor (ESR1), an important protein in breast cancer biology. The sequence includes a mutation that my friend has spent many years working on. The mutation is known as K303R (303rd amino acid in the protein is changed from a lysine [K] to an arginine [R], which alters the function of the protein). For the more biologically savvy -- yes, I know that Deoxy-ribose (D in DNA) is a pentagon, not a hexagon. Too bad. This is art, or my version anyway. ;-)

DNA molecule appliqued onto background


I pieced the DNA backbone and nucleic acids (light hexagons) and then carved stamps and printed the base pairs on each 'nucleotide pair' to represent the sequence. The whole gene is about 3000 base pairs, so obviously this is only a tiny fraction.
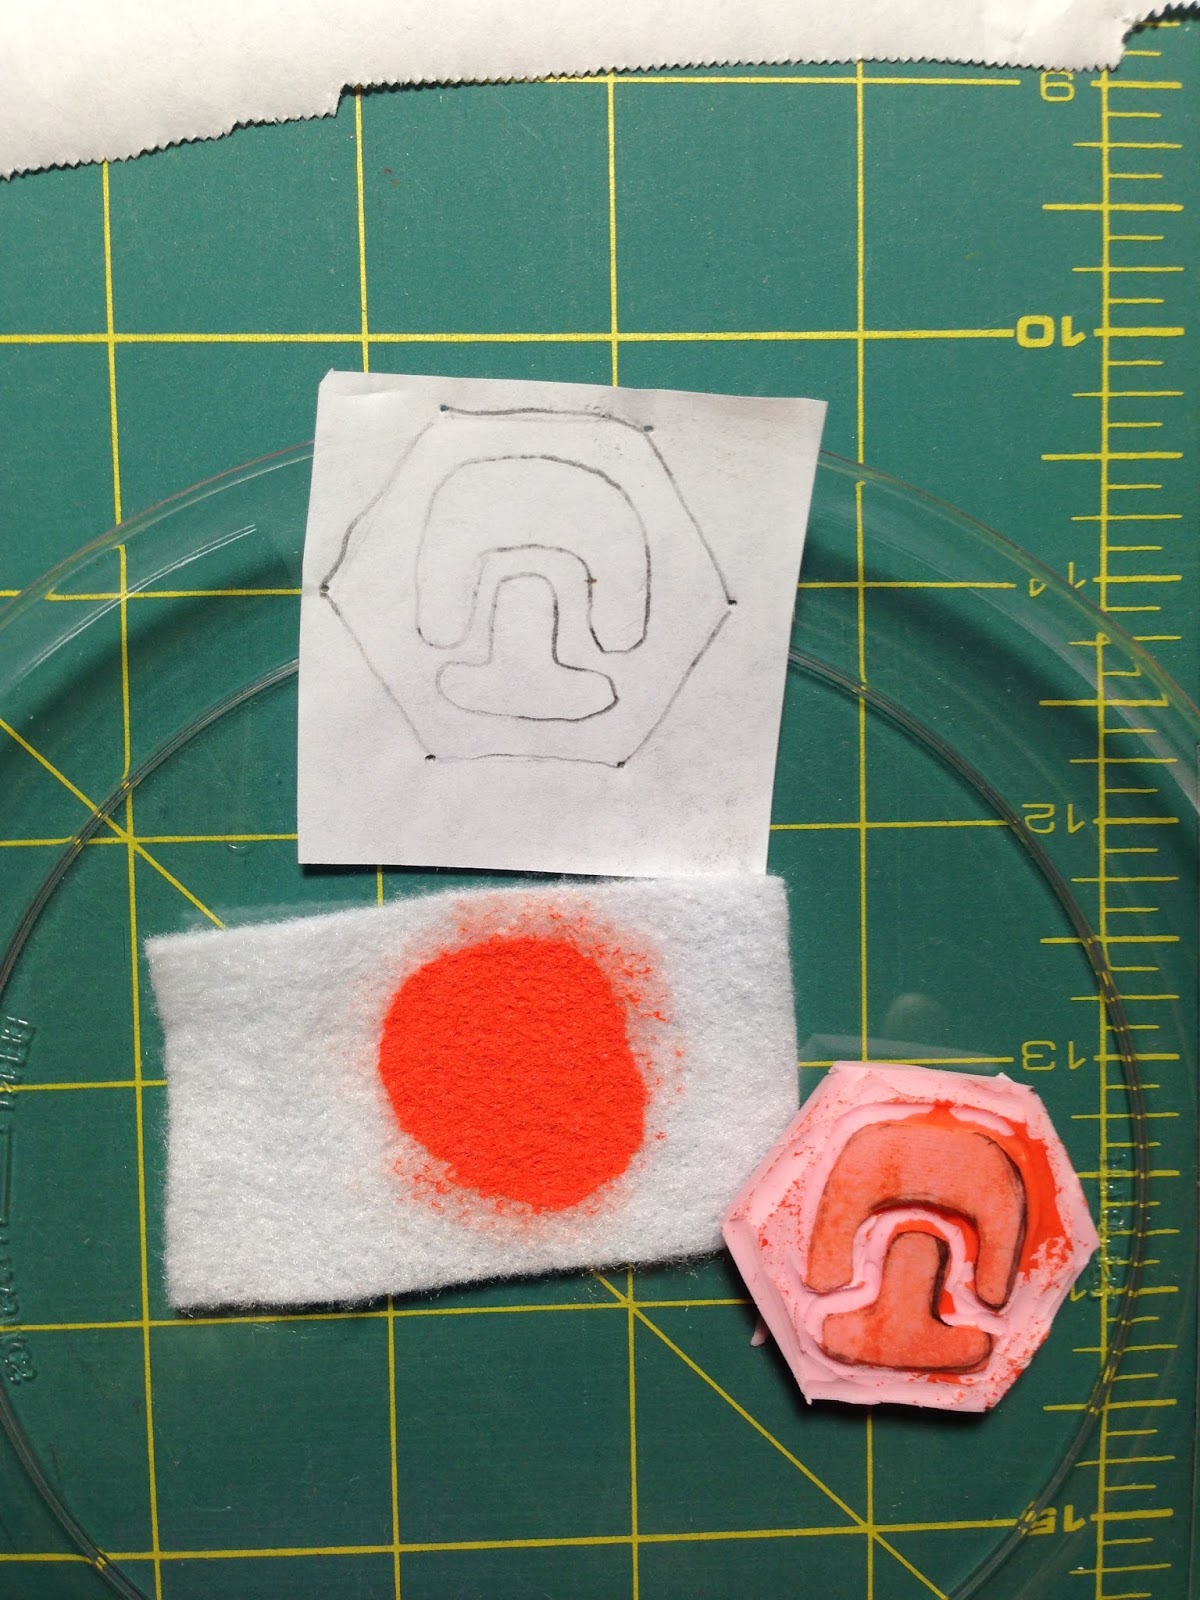

A-T stamp
A-T and G-C stamps with test prints

DNA after printing


I have 'big stitched' some long swooping curves across the surface and am now starting to fill in the regions that the curves define with machine quilting.

Layered and 'Big Stitched'

One of the first things I did was put 'ribbon candy' in between two closely spaced parallel sets of lines. I'm using Magnifico 40wt or KingTut 40wt in the needle and Aurifil 50wt in the bobbin. It was supposed to look a bit like a cell membrane. I'm really bad at ribbon candy, so it looks uneven and is disappointingly wimpy to boot.

Detail of double ribbon candy
Detail of ribbon Candy


I recently got to take a week long workshop at the John C Campbell Folk School with Lori Kennedy. Wow, what fun and what a great learning experience! I especially learned a lot about making the quilting a more visible part of the design. I needed a kick in the pants about this because I tend to second guess myself and am too timid. However, as Lori says, "when in doubt add more lines", so I went back and added another layer of quilting. I'm calling this design variation 'double ribbon candy'. I like the look -- it fills the space better and I think it is an improvement. For now, it is probably as good as it gets, given the busy-ness of the backgound fabric. I have lots more work to fill up the arest of the areas.

Doodled pattern

I love the organic, biology-like pattern of the background fabric (its actually the 'wrong' side of a Kaffe Fassett Millefiori), but it is turning out to be a huge challenge getting any quilting to show, that I did not adequately consider at the start. I will probably live to regret the choice, but for now I'm forging ahead. My current mantra is 'if a little is good, more is better'.

Get out there and vote! Get your mammogram and thanks for reading -- comments are most welcome.

Susan

PS Other DNA quilts in the series cardiac DNA, cardiac DNA continued, and  More DNA.
PPS This quilt is also pictured in AMSTAT News in the column about what statisticians do when they are not doing statistics.

Sunday, October 16, 2016

Ichiban

One of my very dear colleagues is an avid gardener and this spring when he got starts for his backyard 'farm', he got some for me too. Ichiban eggplant. These are wonderful, prolific eggplants and we are still getting fruits. The eggplant 'fruits' are long and thin, with thin edible skins and are absolutely delicious. I wanted to surprise my friend and thank him.

Ichiban Eggplant Ichiban Eggplant -- quilt

This little 9x21 wall quilt (hopefully to be hung in my friend's office) was drawn free-hand but loosely based on numerous images that I have of the real thing. The eggplant and stems are raw-edge applique and are held down with free-motion edge stitching in a heavy purple thread. The free-motion stitched lettering is embellished with hand embroidery.

Detail of embroidery Ichiban Back with fast corners

Ichiban detail


I also free-motion stitched my name and the year -- this is getting easier and at least this time I got the spelling right. The detail also shows my signature couched perl cotton in the ditch next to the binding. I stitch on the folded binding, pull it to the back and glue-baste in place, and then couch the perl cotton down with a narrow zigzag to catch the edge of the binding on the back.

If you have, thanks for reading. Would love to hear what you think.

Susan


PS One additional embellishment -- ANTS, beautiful irridescent purple and green ANTS.
Detail of beaded ants

Saturday, June 4, 2016

Raw-edge applique from the back

These small flower picture quilts were all made with a method that involves stitching the raw edge appliques from the back.The process is as follows:
  • Select a relatively simple photo with high contrast
  • Use photoshop or an online tool to crop, skew, etc and then posterize to get more fabric-able colors and areas
  • Make a tracing that will be reversed on stabilizer or muslin that will stay in the quilt
Columbine
Original photo Posterized photo
  • Make a reversed tracing on stabilizer or muslin, that will stay in the quilt
  • The tracing goes on the back and can be layered with thin batting, and then the background
  • The quilt is built from the background to the foreground by laying the next layer right side up on the background, turning the quilt over, stitching on the lines and then cutting away fabric on the front very close to the stitiching line.
Line drawing, reversed Columbine quilt

Gaillardia
Original photo Posterized photo
  • Once the entire applique is stitched on, add a backing fabric and free motion quilt around the applique to secure and add details
  • Add addition quilting in the background and embellish. In te Gaillardia quilt, I added tiny beads to simulate flowers parts and ants. Note that the leaves were reduced in number and slimplified.
  • The binding is entire done by machine and includes a couched yarn edging. Fast fold corners provide a way to hang.
Gaillardia quilt with ants Gaillardia quilt back


Dendrobium Orchid
Original photo Posterized photo
Here the background was removed completely and the fabrics in the flower were carefully positioned.

Dendrobium quilt


Water Lily
Original photo Posterized photo
I like the background and lily pads on this one, but am less satisfied with the flower. Generally, I like the black thread outlining the shapes, but here the flower is so light that the contrast is too high. A pink or white thread would probably have been better.

I used a polyester felt in this one and it made things very stiff and difficult to stitch. I think I like using a thin leave in stabilizer and no batting to the applique part. It is also important to cut away unnecessary layers from the top to avoid having many layers of fabric to stitch through. This one was also faced instead of being bound.
Water Lily quilt (11X12)
These little gems were relatively quick to make and a lot of fun.
Thanks for reading ...

Friday, April 22, 2016

Dresden Daisies

My Savor Each Stitch group is up to the chapter on  Volume. This is not volume, as in low-volume (i.e. light neutral low contrast color), but volume, as in 3-dimensional.

I went to the local SAQA meeting recently and participated in a little 'try it yourself' experience with fabric manipulation -- folding, tucking, puffing, prairie-pointing, etc. These are definitely ways to add real volume to the surface of a quilt, but I didn't like the results or my fabric choices enough to devote an entire little quilt.

Tucks, stitched down to add dimension

Prairie points, tucks and 3-d colored paper piecing
Of more personal interest to me is paying careful attention to seam direction, combined with density of quilting to create a sense of dimension. I rarely open my seams. This is very popular in modern quilting and does produce a flat surface,but that is actually the problem. Most of the time, I use the seam direction to add dimension and distinguish foreground from back ground.

After playing around with methods of adding dimension with fabric folding, puffing, prairie points, etc, I ended up making a small (12x12) study in seam management to achieve a sense of layering, plus trapunto, and dense vs loose or no quilting to achieve a sense of depth.

My initial inspiration comes from Lee Monroe, who did a trunk show of her quilts for our guild, including a bunch of large and small Dresden plate style quilts and wall hangings. I especially liked the off-center Dresden (http://www.maychappell.com/hatties-dresden-quilt/). Hers has an extra blade, which results in 2 large blades side by side that are the same color. The look is interesting, but also a little odd. I wanted to do something asymmetric using the traditional, even number of blades AND I wanted the result to look like the alternating blades were missing, so that you see through to the background. I designed a paper-pieceable version of my own that reminds me of Daisies or Black-eyed Susans. The flowers are paper pieced individually and then appliqued onto the matching background fabric. The background behind the flowers is then cut-away to allow removal of the foundations. I used That Patchwork Place Foundation paper. It is feeds through the ink-jet nicely and tears off really easily, even using a regular stitch length. Amazing!

Dresden Daisies pieced and getting prepped for applique
 
Dresden Daisies


This will be my donation to the SAQA benefit auction. The whole quilt is 12x12. The biggest yellow flower  is only about 6 inches across. I also added beads to the trapunto'ed centers of the flowers and still have a couple more beaded ants to add to the middle leaf. The paper piecing has been done so that the seams ALL fold under the petals, pushing them to the foreground. Voila Volume. I think the quilting could have had even more contrast between the densely stippled background and more open foreground, but live and learn and move on...

Dresden Daisies, back

Technique Tip: The foundations for the flowers are printed in one piece (closed circle) and then cut open on one seam to allow piecing. The seams do not all lay in one direction the way they normally would when you foundation piece around a circle. The seams of the petals all turn under the petals, adding to the 3D quality. This was done by folding the foundation on the sewing line and sewing next to the fold rather that through the foundation for every other seam. The seams can then be ironed back under the foundation before proceeding to the next blade. I learned this from Judy Mathieson (Queen of the Mariner's Compass), and it is a wonderful technique. She uses freezer paper, which allows you to iron pieces to hold the fabric firmly to the foundation but is also a little harder to tear out. For small pieces, regular foundation paper works fine too. The effect is subtle, but the dimensionality would not be as good otherwise.

Thanks for reading ...

Susan

PS -- this little SAQA donation sold. Yeah.